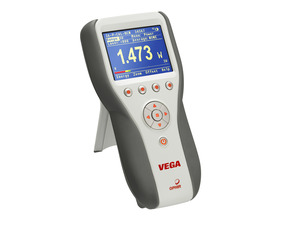
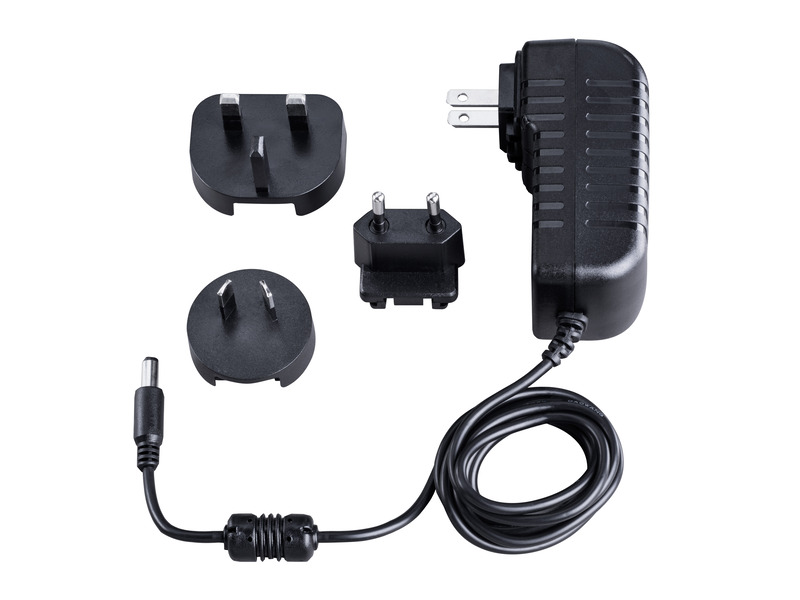
Vega Color Laser Power & Energy Meter
Vega Color Laser Power & Energy Meter
The Vega is a very versatile and sophisticated handheld laser power/energy meter.
Just plug in one of the many Ophir sensors and you have a whole measurement laboratory at your fingertips. The bright color display gives unparalleled legibility and ease of interpreting information
Offered with a two-year extended warranty
- Brilliant large 320x240 color TFT display
- Compatible with standard Ophir thermal, BeamTrack, pyroelectric & photodiode sensors
- Compact handheld design with rubberized bumpers
- Choice of digital or analog needle display
- Illuminated keys for working in the dark
- USB and RS232 output to PC with Statistics package See All Features
Software
PC Software & Drivers
This section describes various ways to interface the Ophir meter to your PC as well as the software options available. Check out the datasheet for more details.
The StarLab application together with an Ophir meter turns your PC or laptop into a full-fledged laser power/energy meter. Supports most Ophir laser power/energy sensors. Up to 8 sensors can be displayed at once on one PC. By using the Ophir COM Object, you can control the device from your own application. Supports the Ariel, Centauri, StarBright, StarLite, Juno, Juno+, Juno-RS, Nova II, Vega, Pulsar-1/2/4, Quasar, EA-1 and Ariel devices.
The StarCom application together with the Ophir meters that utilize the RS232 protocol turns your PC or laptop into a full-fledged Ophir laser power/energy meter. StarCom supports all major Ophir sensors. Supports the Nova, LaserStar, Nova-II, and Vega meters.
Library supplied for a complete measurement interface with most of our USB speaking devices (Centauri, StarBright, StarLite, Juno, Juno+, Nova-II, Pulsar, Vega). Makes use of our new COM object.
Firmware - Vega / Nova II (latest version 2.55)
Embedded s/w for Vega & Nova II Laser Power / Energy Meters
Use StarLab to upgrade the firmware of your device. Follow the step-by-step instructions (see link above).
Specifications
- Product NameVega
- Thermal Sensor CompatibilityYes
- Photodiode Sensor CompatibilityYes
- Pyroelectric Sensor CompatibilityYes
- BeamTrack Sensor CompatibilityYes
- StatisticsYes
- Analog Out1V, 2V, 5V, 10V
- RS23230 Hz
- USB2000 Hz
- Trigger Input/OutputNo
- On-Board Data Storage250k
- Automation InterfaceYes for USB
- Labview VI'sYes
- CE ComplianceYes
- UKCA ComplianceYes
- China RoHS ComplianceYes
Features
Introduction to the StarLab Laser Measurement Application
This video gives an overview of the StarLab application and its various functions. Part 1 of a series of video segments teaching you how to use StarLab.
Setting Your Laser Power Meter To a Custom Wavelength
Learn how to set the correct wavelength for your measurement, even when the wavelength you need is not one of the default wavelengths offered by the meter.
How to see an analog representation of laser power/energy on a scope
Do you sometimes need to see an analog representation of your laser power/ energy on a scope, in parallel to measuring it with a meter? This video will show you how to do that.
Easy Setup of Laser Power Meter and Sensor
See how easy it is to setup an Ophir power meter and sensor to measure your laser's power and energy. Learn more at www.ophiropt.com/photonics.
Clarifications: Range Selection, Measurement Duration
Sometimes, even experienced users of laser measurement equipment come across some issues that, although basic, need to be clarified. This video reviews 2 such issues: (1) selection of correct range when it's not quite obvious (and what happens if one goes over range), and (2) how long a measurement duration may be.
Calibration Factors - Laser Power/Energy Meter
When a power/energy meter is in "Calibrate" mode, various "Factors" are displayed to the user. This video explains the meaning of each of these factors.
Frequently Asked Questions
- What is the Ophir meter zeroing and how often should I zero my power meter?Answer
In all Ophir instruments, all adjustments, including zeroing internal circuits, are done from the software. This ensures simple and accurate realignment. The zeroing process helps eliminate internal biases in the unit which could affect accuracy and repeatability of measurements. It is recommended to re-zero the instrument every month or two for best performance. Specific instructions for doing this can be found in the User Guide/Manual for each instrument.
- Can I buy a universal power adapter/charger for my Ophir display?Answer
Yes. We now offer a switchable universal power adapter/charger P/N
for the Ophir displays. - Why wasn’t the firmware upgraded to the latest version when the meter was sent in for recalibration?Answer
Our recalibration process is to not automatically upgrade the firmware in meters when they are sent in for recalibration, unless specifically requested to upgrade it. The reason for this is that we support many companies, such as medical companies, that have equipment validation processes that don’t allow changing the firmware version from the currently validated version. If you do want the latest firmware version installed, we will do that at no additional charge (for meters which are upgraded electronically) if it is specifically requested on the RMA request checklist form. For older meters (such as the Nova) that are upgraded through changing the EEPROM, a nominal fee is added, if firmware upgrade is requested. Note that upgrading the firmware does not affect the calibration.
- How does an energy meter measure above the maximum frequency at which it can record every pulse?Answer
The energy meters will then sample at close to its maximum frequency. For instance measuring 10 KHz with a PD10 Sensor and Nova II where the maximum frequency for every pulse on the Nova II is 4 KHz: in this case, the Nova II will pick out pulses at a rate of close to 4 KHz and sample them, i.e. the Nova II will record 40% of the pulses.
- I have multiple sensors. Do I need a specific meter for each sensor or can I use one meter for all of my sensors?Answer
With Ophir's Smart Head technology sensors can be interchanged between different meters easily. The calibration and setting information is stored in the sensors Smart Head connector so it moves with the sensor to the new meter. It is recommended that you power off your Nova meter before removing the sensor, but the new Nova II and Vega meters detect that a sensor has been removed or attached and will power cycle themselves when doing this.
- I’ve upgraded to the latest version of StarLab and my meter no longer is supported. What happened?Answer
Whenever we release a new version of StarLab we add support or deal with various other meter-specific issues. This may necessitate upgrading the meter firmware to the latest release. This release is included in the StarLab package and simply enter the Field Upgrade dialog in order to upgrade your meter to be up to date.
- Do I need to recalibrate my instrument? How often must it be recalibrated?Answer
Unless otherwise indicated, Ophir sensors and meters should be recalibrated within 18 months after initial purchase, and then once a year after that.
- Can I use a third party sensor with the Ophir power/energy meters?Answer
No, only Ophir power/energy sensors with the Smart Head connection will work with the Ophir power/energy meters.
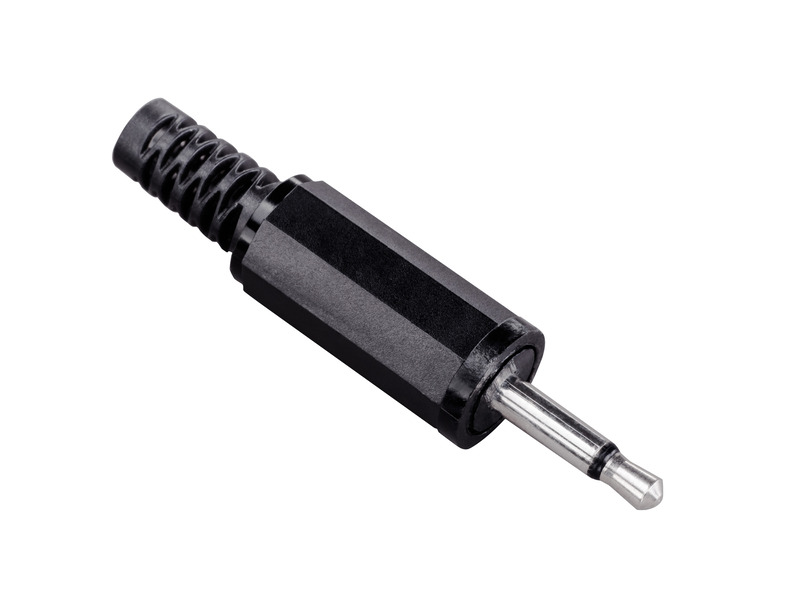
- How do I use the Analog Output of a meter to get a reading of power? And how accurate is it?Answer
The analog output of the meter - using the mating connector provided – gives a voltage signal proportional to the actual reading (it is in fact just a D/A translation of what is being displayed), so it represents a fully calibrated reading. The full scale value is a function of the meter being used and the power range it is on. With the StarBright, Vega and Nova II, for example, the user can select full scale analog output voltage ranges of 1, 2, 5 or 10 V, and the 100% level of the chosen power scale is scaled to the full scale voltage. For example: if you choose 5V full scale analog voltage range, and your sensor is set to a 50 W full scale power range, then you will have 5 V = 50 W or 0.1 V/W. It will vary according to the chosen power range and chosen full scale voltage range. The electrical accuracy is stated in the specification (see the User manual) as ±0.2% (of reading) ±0.3% of full scale volts (in addition to the calibration accuracy of the sensor’s reading itself).
- Can I upgrade my Nova-II or Vega software by myself or do I have to send it in to an Ophir distributor?Answer
The Power and Energy Meter's software can be upgraded by the customer using Ophir's StarLab PC application available for download from the Ophir website.
- Attach the Power and Energy Meters to your PC with the USB cable provided with the Power and Energy Meters.
- Go to the bottom of the StarLab page and download the firmware for your Power and Energy Meters
- Run the StarLab application
- Select your Power and Energy Meters device and press Diagnostics
- Select your meter and press the Upgrade button
- Follow all the on-screen instructions to successfully reprogram the display.
These instructions, including screen captures, can be found at Upgrading Instrument Firmware tutorial.
If the field-upgrade process fails (example, unplug of the USB cable during the upgrade), the Power and Energy Meters will not function properly. Therefore, when turning on the Power and Energy Meters the user gets a blank screen. Note: The Power and Energy Meters can still communicate with the PC. Try to reinstall the Power and Energy Meters software as described above.
- My meter seems to be charging normally, but it lasts for less than an hour on battery power. Does the battery need to be replaced?Answer
Yes, the battery needs to be replaced. A new battery should last 8 hours per charge. We recommend that you send the meter back for battery replacement and recalibration. User battery replacement is possible. For battery part numbers and ordering information, check out the Spare Parts.
- Why doesn’t the StarLab software recognize the Nova II or Vega meter when a RS232 to USB adapter cable is used with the supplied RS232 cable for an interface?Answer
Unfortunately the interface described above is not sufficient to establish the correct communication protocol for the computer USB to interface to the Nova II or Vega meter. The original USB cable (one is provided with each Nova II and Vega meter) is required for the StarLab software to communicate OK. The USB cable is P/N
and is available to order. - What is Ophir Statement of Volatility of Memory for Vega?
Answer
Accessories
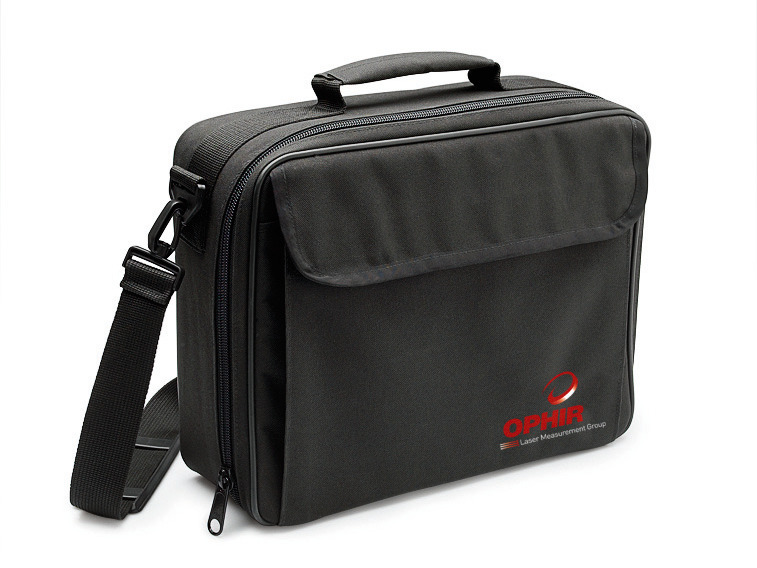
Carrying Case
Carrying case 38x30x11 cm. For laser power / energy meter and up to three sensors
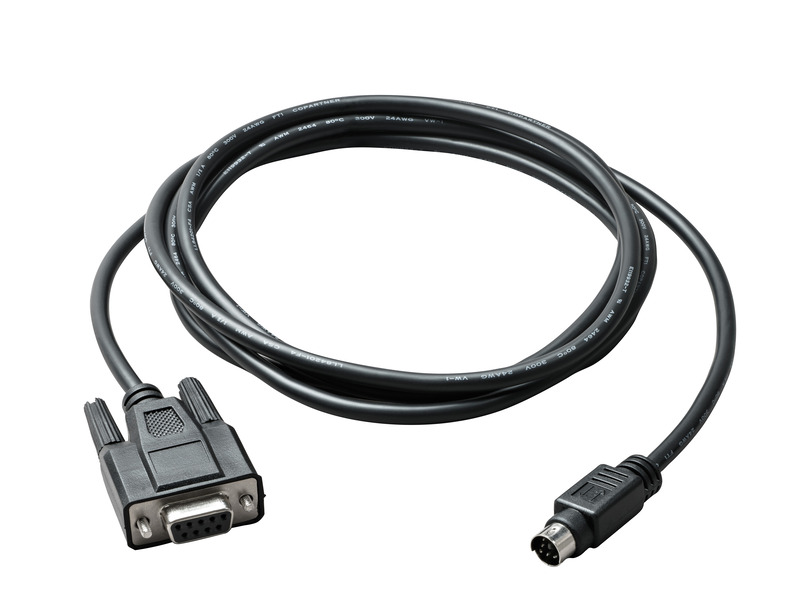
Cables

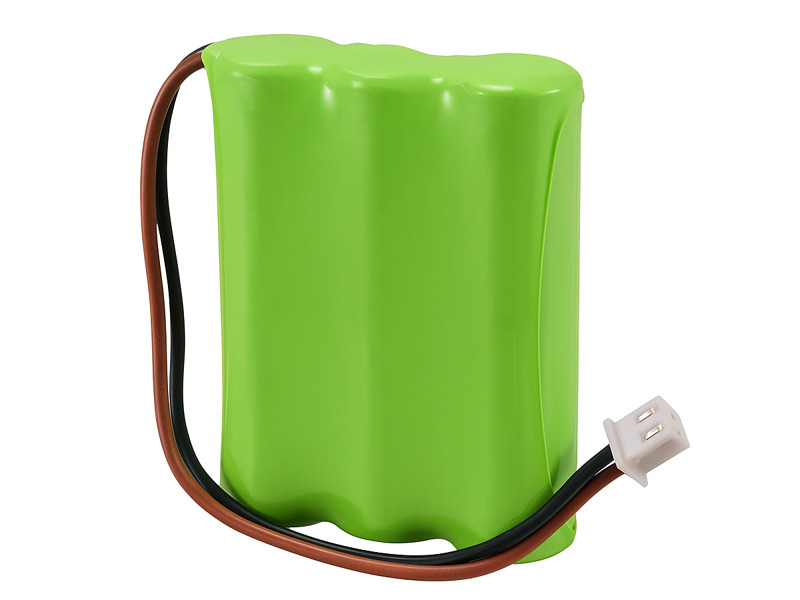
Battery Pack
Replacement battery pack for Nova II, Vega and Quasar.
| Compare | Description | Drawings, CAD & Specs | Avail. | Price | ||
|---|---|---|---|---|---|---|
 | 7E14007ASpare Battery Pack, Nova II, Vega, Quasar Power Meters |
N Polarity Power Supply/Charger
Power Supply/Charger for Centauri, Vega, Nova II, LaserStar, Nova, EA-1, Pulsar, Quasar, 6K-W, 120K-W, 150K-W and fan cooled sensors.
| Compare | Description | Drawings, CAD & Specs | Avail. | Price | ||
|---|---|---|---|---|---|---|
 | 7E05029DC Power Supply / Charger, N Polarity | In Stock |
General Purpose I/O Connector
Used as analog output plug for Centauri, StarBright, StarLite, Vega, Nova II, Nova, and Juno+.
| Compare | Description | Drawings, CAD & Specs | Avail. | Price | ||
|---|---|---|---|---|---|---|
 | 7E02008Analog Output Connector, Power and Energy Meters | In Stock |
Extended Warranty for Sensor
Customers that purchase the above items also consider the following items. Ophir-Spiricon meters and sensors include a standard manufacturers warranty for one year. Add a one year Extended Warranty to your meter or sensor, which includes one recalibration.
| Compare | Description | Drawings, CAD & Specs | Avail. | Price | ||
|---|---|---|---|---|---|---|
 | XWAR-SENSORExtended Warranty for Sensor |
Resources
Data Sheets
Vega Datasheet(243.7 kB, PDF)
Drawings & CAD
VEGA Drawing(185.4 kB, PDF)
Manuals
Vega User Manual(1.3 MB, PDF) Vega Quick Reference(38.5 kB, PDF)
Catalogs
Power/Energy Meter Catalog(25.5 MB, PDF) Laser Power & Energy Measurement and Laser Beam Analysis Catalog(27.5 MB, PDF) Power Meters Catalog(6.5 MB, PDF)
Selection Guides
Meter Comparison Chart(103.2 kB, PDF)
Application Notes
Technical Articles
Main Memory Volatility Statement for Vega Meter(205.4 kB, PDF) Ophir Power/Energy Meter Calibration Procedure and Traceability/Error Analysis Laser Measurements in Materials Processing Deming Must Be Wrong Power and Energy Meters: From Sensors to PC
Technical Notes
Power Meter Logging Accessing Vega log files with StarLab 5 Situations Where Laser Performance Measurement is Necessary How do I know what range, or scale, to set my power/energy meter to? Don’t Damage Your Power Meter by Using the Wrong Power Supply Installing LabVIEW support for Ophir Power Meters and PC Interfaces Power Meter System Integration
Software
StarLab.zip(119 MB, ZIP) StarCom v3.20(3.5 MB, ZIP)