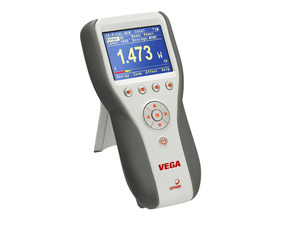
Pulsar 4 Channel PC Interface

Pulsar-4

7Z01201
Четырехканальный интерфейс Pulsar
Описание: 

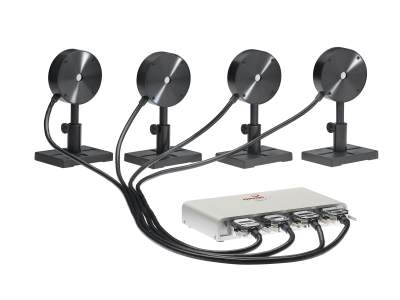
Четырехканальный интерфейс Pulsar от Ophir превращает компьютер или ноутбук в полноценный многоканальный измеритель мощности/энергии лазера Ophir. Просто установите программное обеспечение, присоедините датчик для измерения лазера к Pulsar и соедините USB-кабель Pulsar с USB-портом компьютера. Pulsar-4 позволяет подключить до четырех датчиков для измерения лазера к каждому модулю, следить за каждым импульсом с частотой до 25 кГц и использовать внешний триггер.

  • От датчика для измерения лазера к интерфейсу, к компьютеру.
  • 4-канальная модель
  • Просто подключите и сразу начните работу с большинством датчиков для измерения лазера Ophir.
  • Запись каждого импульса энергии с частотой до 25 кГц.
  • Измеряйте отсутствующие импульсы и выход триггера с помощью внешнего триггера.
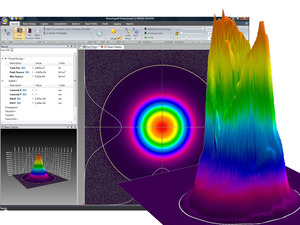
  • Регистрируйте показания мощности и энергии, средние и статистические значения, гистограммы и многое другое, используя приложение StarLab, входящее в комплект поставки.
  • В комплект поставки входят инструменты для системного интегратора: виртуальные инструменты LabVIEW, интерфейс COM-объектов.

Specification

  • Yes
  • Yes
  • Yes
  • No
  • Yes
  • No
  • USB
  • Yes
  • 12V Power Supply (included)
  • N/A
  • N/A
  • N/A
  • 25,000Hz
  • N/A
  • No
  • Yes
  • Yes
  • CE, UKCA, China RoHS
Need help finding the right sensor? Try our Поиск датчиков

FAQ

How can I control Ophir USB speaking devices from the PC?

All USB speaking devices (EA-1, Juno, Juno+, Pulsar and USBI as well as the StarBright, Centauri, Vega, Nova-II, and StarLite Power and Energy Meters) can be controlled via our StarLab. This provides full remote control and measurement capabilities. In addition, system integrators can make use of the OphirLMMeasurement COM object for all of our USB speaking devices that are included in the application installation. Documentation and Examples in Visual Basic, LabVIEW are found in the "Automation Examples" sub-directory of your StarLab directory.

Was this FAQ helpful to you? yes no
Close

What is the maximum number of sensors that can be connected via USB to one PC?

In theory USB supports up to 127 devices.
We recently had 12 sensors connected to StarLab, and it worked normally. The practical limitation is basically how many channels you can realistically see on the display (which would not be a limitation if you will only be logging the data), and of course the number of available USB ports/hubs.

Was this FAQ helpful to you? yes no
Close

What is the difference between the StarCom and StarLab PC applications?

StarCom is our legacy PC application which connects via RS232 (not USB), for old Ophir instruments having RS232 interface capability (Vega, Nova II, LaserStar and Nova). It performs all basic functions such as real-time data logging, saving data in PC file, off-line data viewing, printing, etc. For a relatively new computer, you'd have to check that it has a serial port to which to connect the meter. The last release of StarCom was in 2008, with all that this implies. StarCom should nevertheless be able to work on a Win7 32 bit PC. More information, including software download, is available at https://www.ophiropt.com/laser-measurement-instruments/laser-power-energy-meters/software/starcom.


StarLab is our full-featured PC application that connects via USB to all Ophir USB-speaking instruments (Centauri, StarBright, StarLite, Vega and Nova II meters, as well as Juno, Juno+, EA-1, Pulsar and the Bluetooth-enabled Quasar PC interfaces). In addition to all basic measurement and data logging functions, it also offers a wide range of special functions (including user-defined mathematical functions), multi-channel operation, COM Object for integration with external systems, etc. More information, and software download, is available at https://www.ophiropt.com/en/laser-measurement-instruments/laser-power-energy-meters/software/starlab.

Was this FAQ helpful to you? yes no
Close

How can I interface my Ophir Power Meter (Juno, Pulsar, NOVA II, Vega) to LabVIEW?

For customers using the new LabVIEW COM Demo, there is nothing additional to do. Just open it and get started. If writing your own LabVIEW application, make sure that the OphirLMMeasurement COM Object is included in your LabVIEW application


For customers using the legacy OphInstr LabVIEW package, here are additional clarification steps to assist establishing the interface to LabVIEW when connecting an Ophir meter such as the Juno/USBI/Nova II/Vega with the USB.


The sequence for preparing to interface the Ophir Juno (or meters connected through USB) with LabVIEW is generally as follows:


  • Disconnect any Juno OPHIR Device from the PC
  • Run SwapINF utility
  • Set LabVIEW option On
  • Press "Swap" button - You will be prompted to "Remove the Ophir Juno Devices before continuing" 
  • Press "OK" (you have already removed these)
  • Press "OK" again (after SwapINF is done)
  • Reconnect the Ophir Juno device to the PC that you wish to apply LabVIEW VI's on If asked by Wizard (i.e. in XP) to update software etc.
  • Select "not this time" & press "next" button
  • Again, press "next" (install software automatically)

From here on you may apply LabVIEW VI's on your device

Was this FAQ helpful to you? yes no
Close

I see there is newer version of StarLab software available. Why should I upgrade?

Ophir periodically releases new versions of StarLab, adding new features and fixing bugs, so it's a good idea to keep updated with the latest StarLab version

Was this FAQ helpful to you? yes no
Close

Do I need to recalibrate my instrument? How often must it be recalibrated?

Unless otherwise indicated, Ophir sensors and meters should be recalibrated within 18 months after initial purchase, and then once a year after that.

Was this FAQ helpful to you? yes no
Close

Logging data from multiple sensors: How “in synch” are the time stamps?

Sometimes an application requires logging power from multiple power sensors, and being able to compare readings from the different sensors; in such cases, it is necessary to know to what degree the time points of each “channel” are in synch with each other.

Possible solutions would be to use a 2-channel Pulsar, or for example 2 Juno/Juno+.

With Ophir power sensors, the logged data timestamps originate from the PC, with millisecond resolution, for both Pulsar’s and Juno/Juno+.

So basically there is no difference between a Pulsar and a Juno/Juno+ in that respect. They will perform the same.

Each measurement will have its own separate timestamp, and will not have the exact same zero point; however, they will be ‘synced’ to each other to within a millisecond or so. Keep in mind that with power measurements, the instrument’s A/D sampling rate of the power signal is 15Hz (i.e. every 66.67 msec), so for all practical purposes the 2 channels can be considered in synch with each other.

Was this FAQ helpful to you? yes no
Close

What is Ophir Statement of Volatility of Memory for Pulsar

See attached

Was this FAQ helpful to you? yes no
Close
  • PC Software & Drivers

    This section describes various ways to interface the Ophir meter to your PC as well as the software options available.


  • StarLab

    The StarLab application together with an Ophir meter turns your PC or laptop into a full-fledged laser power/energy meter. Supports most Ophir laser power/energy sensors. Up to 8 sensors can be displayed at once on one PC. By using the Ophir COM Object, you can control the device from your own application. Supports the Ariel, Centauri, StarBright, StarLite, Juno, Juno+, Juno-RS, Nova II, Vega, Pulsar-1/2/4, Quasar, EA-1 and IPM sensor devices.

  • LabVIEW

    Library supplied for a complete measurement interface with most of our USB speaking devices (Centauri, StarBright, StarLite, Juno, Juno+, Nova-II, Pulsar, Vega). Makes use of our new COM object.


  • Firmware - Pulsar

    Embedded Software for Pulsar Interface. 
    On startup, StarLab loads the Pulsar interface with its firmware automatically (current version: 1.30).

System Integrators

Besides their use as stand-alone, fully featured laser power/energy meters, Ophir devices are easily incorporated into larger end-user applications. This allows system integrators to leverage Ophir’s excellence in measurement capabilities with legacy analysis packages.


Ophir provides a common interface for communication and control of all of our USB speaking devices. OphirLMMeasurement is a COM Object that is included as part of the StarLab installation (StarLab 2.10 and higher) that allows the system integrator to take control of the Juno, Juno+, Nova-II, Pulsar and Vega, Centauri, StarBright and StarLite devices; integrating them into his in-house measurement and analysis package.
 
For communication via USB, device drivers and additional support software must be installed on your PC. These components are installed as part of the StarLab application’s installation process.
 

System Integrators will need the following components:

  • OphirLMMeasurement COM Object.pdf lists and describes the methods and events available for configuring, controlling and uploading measurements from Ophir devices.
  • OphirLMMeasurement.dll. COM object component developed and supplied by Ophir for communication with the Juno, Juno+, Nova-II, Pulsar, USBI, Vega, Centauri, StarBright and StarLite devices. The COM object is registered when the application is installed.
  • OphirLMMeasurement COM Object.pdf describes how to register it on another PC where the Ophir application has not been installed.
  • Standard USB cable (P/N 7E01202) for use with the Pulsar devices (included).
  • Ophir provides example projects of COM Object clients in VC#, VB.NET and LabVIEW. These are found in the Automation Examples subdirectory of our StarLab PC Application.
  • For direct control of the device, refer to User Commands

Videos

StarLab 3.0: Introduction and First Steps StarLab 3.0: Introduction and First Steps
StarLab 3.0: Second Steps StarLab 3.0: Second Steps StarLab 3.0: Second Steps

Sometimes we want to not only get a reading, but perform additional processing on the reading. This video shows you how to use various functions in StarLab, such as Averaging, Scale Factor, Normalize, Density, etc.

How to detect missing laser pulses How to detect missing laser pulses How to detect missing laser pulses

This video will show you how to detect and record any missing pulses in your pulsed laser beam application.

Laser Measurement PC Interfaces Laser Measurement PC Interfaces Laser Measurement PC Interfaces

If all your laser measurement work involves a laptop or a PC, rather than a stand-alone meter, one of Ophir’s direct-to-PC interfaces could be an ideal solution. These are full-fledged Laser Power and Energy meters, but instead of having a separate on-board display, the PC becomes your display. In this video you will learn about the range of PC Interfaces available from Ophir.

This video explains the various items on the StarLab screen, and shows you how to perform basic laser measurements.
Part 1 of a series of video segments teaching you how to use StarLab.

Tutorials

Tutorials and Articles

Longer Length Sensor Cables

The Ophir sensors are provided with a 1.5m cable between the sensor and the smart head connector. When a longer length cable is needed it can be provided, as long as it is within operational limits. However it is not possible to add an extension to the cable, because that moves the smart head connector away from the meter or interface unit which can degrade the smart head functionality or disable it.

 Прочитать подробнее…

Ophir Power/Energy Meter Calibration Procedure and Traceability/Error Analysis

This document discusses the interpretation and basis for stated measurement accuracy of Ophir Laser Power/Energy meters.
1. General Discussion
2. Combination of Errors and Total Error
3. Analysis of Power and Energy Calibration Errors
4. Detailed Analysis of Power and Energy Calibration Errors

 Прочитать подробнее…

Laser Measurements in Materials Processing: How and When They Absolutely, Positively Must Be Made

19th century British physicist and engineer William Thomson, 1st Baron Kelvin, was the first to say, “If you can’t measure it, you can’t improve it.” When applying this principle to improving laser-based processes, there are a variety of parameters that must be measured. Given the continuously rising power of laser systems in material processing, the requirements for measurement systems are more challenging than ever. Which technologies are available to measure high-power lasers? How often should they be measured? What measurements should be tracked? When this data is collected, what should be done with it? Прочитать подробнее…

How do I know what range, or scale, to set my power/energy meter to? And what happens if I go over range?

Each given range represents one level of gain of an internal amplifier. The electronics, as always, have a limited Dynamic Range. If the measured signal is too low, in other words near the bottom of the range, then it may be lost in the noise and the reading will be inaccurate and noisy. If it’s too high – there may be saturation issues. To give an instrument a usefully wide dynamic range, multiple scales or ranges are used. Switching from range to range can be automatic (“Autorange”), or manual. Autoranging simply starts automatically at the least sensitive range and works its way down the ranges, sampling the signal as it goes, till it finds a range at which the signal is properly detected. Note, by the way, that only in POWER mode is Autoranging available. If we are working in Single Shot Energy mode, there is no Autoranging – simply because when we are measuring a single pulse, the instrument has no opportunity to work its way down the ranges as in Power mode.

 Прочитать подробнее…

5 Situations Where Laser Performance Measurement is Necessary

Measuring the performance of a laser has possible for a number of years and is accomplished with a variety of techniques. These electronic laser measurement solutions give the laser user more relevant, time-based data that shows trends in laser performance rather than single data points. While these solutions have provided laser users with the ability to present data in a simple and easy to understand manner, the application of the data still seems to be unclear to many laser users. Прочитать подробнее…

Power and Energy Meters: From Sensors to PC

From the time of its invention, more than 30 years ago, the laser power meter was generally comprised of two parts: a measurement sensor and a display meter. It was always considered better to have such an arrangement with a cable connecting the two because of the hazardous nature of the laser beam. As the display of the results is separated from the measurement sensor, so are the eyes of the operator separated from the laser beam. Прочитать подробнее…

Accessories

Customers that purchase the above items also consider the following items. Ophir-Spiricon meters and sensors include a standard manufacturers warranty for one year. Add a one year Extended Warranty to your meter or sensor, which includes one recalibration.
  • N Polarity Power Supply/Charger

    Power Supply/Charger for Centauri, Vega, Nova II, LaserStar, Nova, EA-1, Pulsar, Quasar, 6K-W, 120K-W and fan cooled sensors (1 unit supplied with these products)

  • Extended Warranty for Power Meter

    XWAR-METER

    Ophir-Spiricon meters and sensors include a standard manufacturers warranty for one year. Add a one year Extended Warranty to your meter or sensor, which includes one recalibration. More info