Magnification Calibration Procedure

The beam profiler magnification calibration involves measuring spot centroids for known beam position translations. This can be done either by moving the profiler or moving the spot. The former method is preferred since the profiler with magnification is usually mounted to a high quality 3-axis translation stage. For a 25x or greater magnification it is recommended to use a stage equipped with a differential micrometer capable of producing accurate and repeatable 1μm steps.

Author:

Jeffrey L. Guttman, PhD, Director of Engineering, and Allen M. Cary, Sales & Marketing Manager, Ophir-Photon LLC

As an example, for one common differential micrometer made by Newport, one revolution of the micrometer will cause a position change of 25μm, which when magnified 25x will equal a change in position of 0.625mm (625µm) at the profiler. For nominal magnifications in the 2-3x range, an ordinary micrometer adjustment can be used.

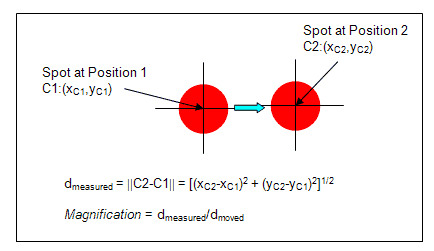
Figure 1. Illustration of the calibration procedure

Configure the profiler with magnification (e.g., Photon Near Field Profiler or Focused Spot Profiler) to observe a spot near the center of the aperture or CCD array, at position C1. Measure the centroid in x and y. Translate the profiler a known distance and measure the new centroid position C2. The magnification is then the ratio of the measured distance to the known moved distance. For example, if you move the profiler a known distance of 100 µm, and the measured distance between the centroid positions reported by the profiler is 996.5 µm, then you will have calibrated your nominal 10x magnification to actually 9.965x.

As a general guideline, choose an appropriate position shift for the calibration, based on the aperture or CCD array dimensions. For example with a 6.49 mm x 4.83 mm CCD and a 100 μm 1/e2 spot diameter with 10x magnification, it is possible to move the spot a maximum of ~225 μm to either side of center, and only ~140 μm on either side of center in the vertical direction. Translate the beam a known distance to one side in x, and record the new centroid positions. Move the beam back to the center of the array and again record the centroid position. Now move the beam to the other side of the centroid and record the new centroids. The data provides the distance between “known” positions, and thus two measures of the magnification. An average of the numbers can be used for the calibrated magnification. If desired, the procedure can be repeated in the y direction.

Contact Us illustration

Have questions? Require assistance?

Click below to to contact Ophir Photonics and we'll get back with you shortly.

Contact Ophir Photonics