Helios | Laser Thermal Power Sensors | Power Sensors - Ophir

Helios Plus - EtherNet/IP

7Z07101
概要: 

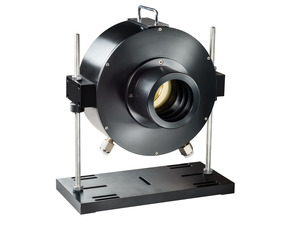
Helios Plus - EtherNet/IP はハイパワーレーザー出力測定用パワーメーターで、短時間のレーザー照射で最大測定出力12kWまでのパワー測定に対応。レーザー入射時間は0.3から数秒と短時間で、入射された出力を元に出力値を算出。5kJ までのエネルギーであれば水冷却も不要で省スペースでの測定が可能。 Helios Plus-EtherNet / IPは、EtherNet / IPおよびRS232通信、電源およびデータ用のAIDA互換コネクタを備えたHeliosのバージョンです。 Profinetの通信については、Helios Plus-Profinetを参照してください。 EtherCAT通信については、Helios Plus-EtherCATを参照してください。

仕様

  • LP2型、吸収率~94%
  • Ø50mm
  • 450-550nm, 900-1100nm
  • 50W-12kW
  • 100J – 5kJ
  • N.A.
  • 縦200mm x 幅123mm x 高さ144mm (カバー開放時)、 縦200mm x 幅100mm x 高さ84mm (カバー閉塞時)Connectors: AIDA, DB9
  • N.A.
  • N.A.
  • 3 s
  • N.A.
  • 4kJ/cm²
  • 12kW
  • N.A.
  • CE, UKCA, 中国RoHS
センサのモデル選択には、センサファインダが便利です。
または弊社までお気軽にお問合せください。

FAQ

ヘリオスは水冷なしで、どうやって高出力パワーを測定できるのですか?

ヘリオスのコンパクトボディで高出力パワーを測定するのは、露光時間が鍵となります。最大エネルギは10kJなので約0.8秒の露光で最大12kWまでの測定となります。

Was this FAQ helpful to you? yes no
閉じる

ヘリオスの応答速度は2.5秒なのにどのように1秒以下の露光時間で測定できるのですか?

レーザパワーを直接測定するのであれば2.5秒の応答速度は実際問題になります。実際には、パルスエネルギを測定してパワーを積分しています。内部でフォトダイオードが使用されておりパルス幅を検知します。パワーは P = E / Δtとして計算されます。

Was this FAQ helpful to you? yes no
閉じる

ヘリオスはどのようにインストールしたら良いですか?

基本使用方法としては、Profinetには電源ケーブルと Profinet 用ケーブルが各1本ずつ必要です。ヘリオスをライン/スター型トポロジで使用する場合、デイジーチェーンでつなぐので、電源ケーブルと Profinet 用ケーブル1本ずつご使用ください。

RS232は標準DB9 RS232ケーブルを使用します。Profinetグレードケーブルと RJ45コネクタをご使用ください。

電源は Han PushPull シリーズの標準 Profinet電源です。詳細や組み合わせコネクタについてはマニュアルの第3章をご参照ください。

Was this FAQ helpful to you? yes no
閉じる

瞬時のセッションでどのくらいの測定ができますか?

ヘリオス本体が到達する限界温度があり、これは内部センサで測定されます。温度は60℃以上を超えないようにしてください。約40kJまでの露光に対応すると確認済みです。ヘリオス本体を冷却するよう感覚を開ければ、当然より多くのエネルギが確保できます。そのような理由で、温度センサがオーバーヒート主要インジケータとして使用してください。

Was this FAQ helpful to you? yes no
閉じる

ヘリオスがクールダウンするには、どのくらい時間がかかりますか?次のレーザ入射までどのくらい時間がかかりますか?

ヘリオス最大温度60℃(最大40kJ・蓄積されたエネルギ)に到達した後、室温に戻るまでには10〜20分かかります。従って、どのくらいのパルスが測定されたかを確認するために温度センサを使用してください。

Was this FAQ helpful to you? yes no
閉じる

ヘリオスには、損傷を避けるためにインターロックオプションがありますか?

RS232またはProfinetが使用され、現在温度のコマンドがありますので温度が限界を超えないように設定してください。PCアプリケーションのOptionsを選択してからLog Temperature Enableを選択すると現在温度が表示され、ログされます。温度が限界を超える場合は、赤色になります。

Was this FAQ helpful to you? yes no
閉じる

ヘリオスのLEDインジケータは何を示しますか?

7つのLEDがあります。

  1. 1.パワー
  2. COM(緑)
  3. COM(赤)
  4. リンク(ポート1)
  5. TX/RX(ポート1)
  6. リンク(ポート2)
  7. TX/RX(ポート2)

詳細はマニュアルの第7章をご参照ください。

Was this FAQ helpful to you? yes no
閉じる

ヘリオスのガラスウインドウのクリーニング方法を教えてください。

メタノールで、ティッシュまたはエアーでクリーニングを行ってください。

Was this FAQ helpful to you? yes no
閉じる

計測器は校正を受ける必要がありますか。ある場合、校正を受ける頻度をお知らせください。

特に指定がない限り、オフィールのセンサー及びディスプレイは購入日から18か月以内に初回の校正を受けて頂く事をお勧め致します。その後は年次定期校正を受けて頂く事を推奨致します。

Was this FAQ helpful to you? yes no
閉じる

Can a laser measurement depend on the distance from the laser to the sensor?

In theory, if a beam is completely parallel and fits within the aperture of a sensor, then it should make no difference at all what the distance is; it will be the same number of photons (ignoring absorption by the air, which is negligible except in the UV below 250nm). If, nevertheless, you do see such a distance dependence, there could be one of the following effects happening:

  • If you are using a thermal type power sensor, you might actually be measuring heat from the laser itself; when very close to the laser, the thermal sensor might be “feeling” the laser’s own heat. That would not, however, continue to have an effect at more than a few cm distance unless the light source is weak and the heat source is strong.
  • Beam geometry – The beam may not be parallel and may be diverging. Often, the lower intensity wings of the beam have greater divergence rate than the main portion of the beam. These may be missing the sensor's aperture as the distance increases. To check that you'd need to use a profiler, or perhaps a BeamTrack PPS (Power/Position/Size) sensor.
  • If you are measuring pulse energies with a diffuser-based pyroelectric sensor: Some users find that when they start with the sensor right up close to the laser and move it away, the readings drop sharply (typically by some 6%) over the first few cm. This is likely caused by multiple reflections between the diffuser and the laser device, which at the closest distance might be causing an incorrectly high reading. You should back off from the source by at least some 5cm, more if the beam is not too divergent.

Needless to say, it’s also important to be sure to have a steady setup; a sensor held by hand could easily be moved around involuntarily, which could cause partial or complete missing of the sensor’s aperture at increasing distance, particularly for an invisible beam.

Was this FAQ helpful to you? yes no
閉じる

アクセサリ

上記のセンサに対応するアクセサリを各種ご用意しています。
  • Power Supply Cable for Helios Plus and IPM-COM

    7Z10458A

    Power Cable, AIDA female, 4-pin, to flying leads, 5m (1 unit supplied with Helios Plus, not supplied with IPM-COM)

  • EtherNet/IP Cable for Helios Plus

    7E01299

    EtherNet/IP Plug RJ45 IP67 5m Cable (1 unit supplied with Helios Plus)

  • ヘリオス用 RS232 ケーブル

    7E01209

    D9F - D9M シールド RS232ケーブル 10m

  • Helios Plus Window Replacement Kit

    7Z08369

    Kit for replacing the Helios Plus window