SLM Troubleshooting Made Easy with BeamWatch® AM

When we developed BeamWatch AM, we not only drew diagrams and thought about great features, we also talked to experienced manufacturers of selective laser melting (SLM) machines about issues they needed to address and parameters they were interested in. Bit by bit, we created a measuring device that is compact, fast, and delivers a precise view of the laser beam.

Author:

Christian Dini, Director Global Business Development, Ophir

During the final stage of development, the German Fraunhofer Research Institution for Additive Manufacturing Technologies (IAPT), one of several beta sites, conducted a series of tests using BeamWatch AM with five different SLM machines. They were able to uncover detailed insights based on precise measurements and learn more about the everyday use of the measurement system. Today, after the testing is finalized and BeamWatch AM has been successfully released to the market, the Fraunhofer experts still rely on the non-contact measurement device. One reason is the easy trouble shooting enabled by BeamWatch AM. Let’s have a look at a concrete example.

An SLM machine is producing high-grade parts when inspection detects bad surface quality of the printed parts. There is high porosity in the printed specimens. In a first step, experts evaluate the beam parameters using a camera. Figure 1.

Figure 1. Beam measurement process using a CCD-camera.

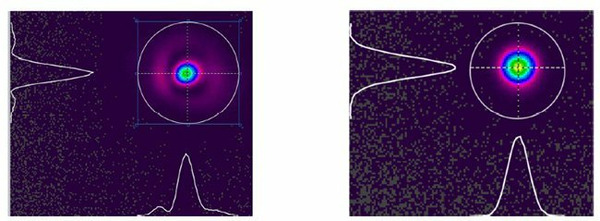
Using the CCD camera, they are able to measure the 2D beam profile, the beam diameter, as well as other beam parameters. But this will not provide details about the laser power on the build plane nor the focus shift. Another challenge is the installation of the camera in the SLM production chamber; it needs to measure the beam exactly in the focal point.

The engineers received the following images:

Figures 2 and 3. Measurements made with CCD camera. Left: the SLM machine with quality problems. Right: the machine without quality problems. (Source: Fraunhofer Research Institution for Additive Manufacturing Technologies IAPT)

In order to determine the issues and find out why the quality deteriorates, we need more specific characteristics. This is when BeamWatch AM is used. The compact measurement device is placed in the center of the build plane. The user lowers the work plane to exactly the calibrated distance shown on the BeamWatch AM label, ensuring that the system is adjusted to the software-calibrated distance. The input aperture is placed directly underneath the laser source in central position. Measurement of the beam is taken within a closed housing with a pneumatic shutter. No contact is made with the laser beam as the measurement is based on the Rayleigh scattering of the laser light. Within fractions of a second, a camera measures 2048 beam profiles and the system calculates all relevant beam parameters.

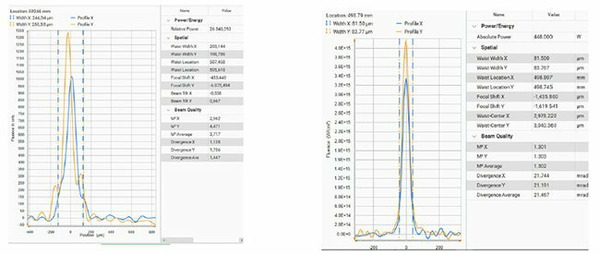
Figures 4 and 5. Measurements made with BeamWatch AM. Left: A diffraction influences the laser beam. Right: this beam shows a clear Gaussian profile (Source: Fraunhofer Research Institution for Additive Manufacturing Technologies IAPT)

Comparing the Two SLM machines with BeamWatch AM

Using BeamWatch AM, we can see in the left graph a diffraction influencing the laser beam; on the right, there is a clear Gaussian profile. The focus shift and the different direction of the beam from X- to Y-axis result in reduced power density within the larger focal point. This explains the deterioration of the surface and loss of material strength.

The detailed measurement provided by BeamWatch AM allowed the engineers to quickly find the reason for the quality issues: The beam path had been misaligned between collimator and the focus shifter, clipping one side and causing the asymmetric beam profile and propagation difference between X- and Y-axis. Once the optical elements were been adjusted, the power density grew with the smaller focus. The quality issues were resolved without external support by the manufacturer of the machine.

Conclusion

When asking the SLM manufacturers and users about what they need to know about the laser beam, the first answer we mostly get is, the cross section of the beam profile. The example above shows clearly that this is not the clue to most problems. BeamWatch AM delivers significantly more information and can track changes over time at video rates. The system allows for the delivery of completely new beam measurements, such as astigmatism or real time focus shift.

Extensive testing made with the Rayleigh scatter technology also shows that BeamWatch achieves ISO-compliant measurements. It has been demonstrated that the methods used to obtain and refine the BeamWatch data validate the claim that the technology meets ISO 11146 standards. Adding to that the simplicity of setup, results in a new, valuable service tool for SLM system manufacturers or trained users.

Contact Us illustration

Have questions? Require assistance?

Click below to to contact Ophir Photonics and we'll get back with you shortly.

Contact Ophir Photonics